
Easy 3-Step Parallel Parking With 3 Simple Markers -Optimal Solution Explained
For new drivers, parallel parking is considered to be the hardest skill. For non-new drivers, the problem is not remembering how to do it when it is needed. Or you may not have the confidence to do it in one shot.
youtube
Mathematically, there is only a single fixed solution to parallel parking. If you follow the instructions exactly, there should be no variations and anyone should be able to complete the parking in one shot without hesitation. When you have a problem, either you are not following the instructions correctly and precisely or more commonly the instructions were not precise and were hard to interpret. Today I am giving you the shortest and very precise instructions in just 3 steps. Instead of using common phrases such “knowing your 4 wheels” or “don’t collide front, back, left or right”, I am providing you with 3 easy to understand and well-aligned markers to follow while you are inside the car driving. Before releasing this video, I had created 5 different videos ranging 3 minutes to 14 minutes. After limited testing, people can easily follow the instruction for the shorter version but they may not remember forever. This version of video is a little long because I want to demonstrate multiple times and I want to explain the concept well so that you will never forget. Once you learn it, you’ll be good for life.
I understand that some of you may have your own preferred set of instructions, and may have already mastered the art of parallel parking. However, teaching someone else is quite a different thing! I have spent a year in researching and producing this video, so I would appreciate any comments that let me know if the concept in this video is good or not.
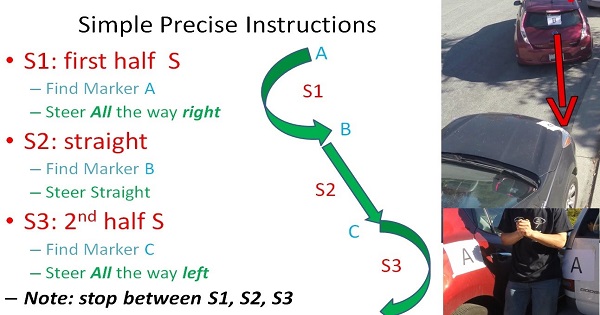
For beginners, you may start your practice by memorizing this color coded diagram:
http://fetv.com/wp-content/uploads/2016/07/parallel_parking_instruction.jpg
Remember, there are 3 steps, for each step you are looking for a marker, if you fail to find the marker, then you go back to the initial point (marker A) and start over again. You repeat until you have the perfect skill. If you are non-beginners, understanding the reasons to have the 3 markers would allow you to re-create the details many years later, so that you will never forget what you have learned today.
I have done extensive research on all existing presentations and come up with this optimal one. I am aware some viewers may use other reference points. That is fine, except you need to be aware a few things:
Marker A: optimal markerA position is on your car’s rear axle. This will guarantee the shortest turning distance without collision. Some people may use the mirror or the light as their marker, or align the rear bumpers. These alternatives are good approximation to my optimal markerA position if the 2 cars have similar length. If the 2 cars don’t have the same length, using the alternatives may collide the side of the car.
Marker B: some people may use the side window to find other reference points, this is fine if you don’t drive other cars because side window shape vary a lot, it is better to use rear window.
Tags
parallel parking
how to
parallel park
easy
simple
short
align
reference point
marks
marker
3 steps
3 markers
confidence
never forget
remember
learn
understand
instruction
Mathematically
Easy 3-Step Parallel Parking #best #easiest #ParallelParking https://t.co/5KFBiu230N
— Genius Asian (@RealGeniusAsian) May 18, 2018