Easy 3-Step Parallel Parking With 3 Simple Markers -Optimal Solution Explained
Key Takeaways
- For new drivers, parallel parking is considered to be the hardest skill
- For non-new drivers, the problem is not remembering how to do it when it is needed
- Or you may not have the confidence to do it in one shot
- Mathematically, there is only a single fixed solution to parallel parking
- If you follow the instructions exactly, there should be no variations and anyone should be able to complete the parking in one shot without hesitation
Why This Matters
For new drivers, parallel parking is considered to be the hardest skill. For non-new drivers, the problem is not remembering how to do it when it is needed. Or you may not have the confidence to do it in one shot. Mathematically, there is only a single fixed solution to parallel parking. If you follow the instructions exactly, there should be no variations and anyone should be able to complete the parking in one shot without hesitation. When you have a problem, either you are not following the instructions correctly and precisely or more commonly the instructions were not precise and were hard to interpret. Today I am giving you the shortest and very precise instructions in just 3 steps. Instead of using common phrases such “knowing your 4 wheels” or “don’t collide front, back, left or right”, I am providing you with 3 easy to understand and well-aligned markers to follow while you are inside the car driving. Before releasing this video, I had created 5 different videos ranging 3 minutes to 14 minutes. After limited testing, people can easily follow the instruction for the shorter version but they may not remember forever. This version of video is a little long because I want to demonstrate multiple times and I want to explain the concept well so that you will never forget. Once you learn it, you’ll be good for life. I understand that some of you may have your own preferred set of instructions, and may have already mastered the art of parallel parking. However, teaching someone else is quite a different thing! I have spent a year in researching and producing this video, so I would appreciate any comments that let me know if the concept in this video is good or not. For beginners, you may start your practice by memorizing this color coded diagram: Remember, there are 3 steps, for each step you are looking for a marker, if you fail to find the marker, then you go back to the initial point (marker A) and start over again. You repeat until you have the perfect skill. If you are non-beginners, understanding the reasons to have the 3 markers would allow you to re-create the details many years later, so that you will never forget what you have learned today. Index I have done extensive research on all existing presentations and come up with this optimal one. I am aware some viewers may use other reference points. That is fine, except you need to be aware a few things: Marker A: optimal markerA position is on your car’s rear axle. This will guarantee the shortest turning distance without collision. Some people may use the mirror or the light as their marker, or align the rear bumpers. These alternatives are good approximation to my optimal markerA position if the 2 cars have similar length. If the 2 cars don’t have the same length, using the alternatives may collide the side of the car. Marker B: some people may use the side window to find other reference points, this is fine if you don’t drive other cars because side window shape vary a lot, it is better to use rear window.
Understanding the Basics
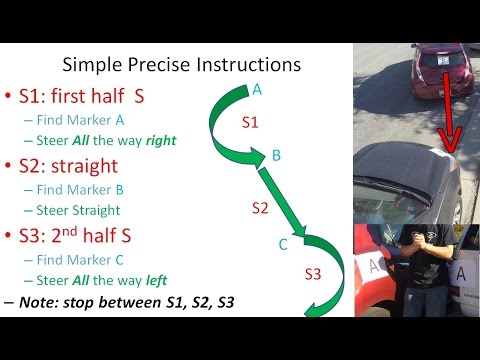
The S-shaped path your car follows during parallel parking can be broken down into exactly three steps with three corresponding markers (A, B, and C). Marker A is at the starting position aligned with the car in front of the space. Marker B tells you when to start turning the wheel the opposite direction. Marker C tells you when the car is fully in the space. The key insight is that the optimal starting position (Marker A) is at your car’s rear axle — not the mirror, not the bumper, but the rear axle. This guarantees the shortest turning distance without collision regardless of the relative sizes of the two cars.
The DIY Advantage
Professional driving lessons cost $50 to $100 per hour, and many students need multiple lessons just to master parallel parking. Learning this systematic method lets you master the skill in one practice session.
Tips for Best Results
If you fail to find Marker B during the maneuver, do not try to adjust — return to Marker A and start over. This is faster and more reliable than trying to correct mid-maneuver. Practice the three-step method in an empty parking lot using traffic cones before trying it in real traffic. The mathematical precision of this method means it works identically whether you are parking a compact car or a full-size SUV.
Video Chapter Guide
Here is a quick reference for the key sections covered in the video:
- 0:00 easiest: 3 easy step and 3 simple markers
- 0:20 S shape parking into 3 steps
- 0:55 3 reference points A, B, C
- 1:23 3 steps in red, 3 markers in blue, 3 moves in green
- 1:45 step 1
- 2:05 step 2 and step 3
- 2:25 marker A
- 2:55 marker B
- 3:20 marker C
- 4:17 marker A demo
- 4:38 step 1 demo
- 4:58 marker B demo and step 2 demo
Use these timestamps to jump directly to the section most relevant to your situation.
More Practical Guides
Once you learn the three-marker method, parallel parking becomes a mechanical process you can execute confidently for life.
For more hands-on tutorials, check out our guides on changing transmission fluid and replacing front brake pads. Each one follows the same practical, no-nonsense approach to help you save money and build useful skills.