N Ways To Remove An Oil Filter Without Special Tool, DIY - in 4K UHD
Multiple Ways to Remove an Oil Filter Without Special Tools
Key Takeaways
- Most oil filters come off easily by hand, but occasionally you encounter an extremely stubborn one
- Four different improvised methods can remove a stuck filter using common garage items
- The two key principles are: creating a non-slip grip and applying leveraged force
- The rope plus wrench method was voted the best by viewers
- This is conceptually similar to opening a stubborn jar — grip plus leverage equals success
When You Need These Techniques
Most of the time, an engine oil filter can be removed by hand or with a basic filter wrench. But occasionally you encounter one that has been over-tightened, baked on by engine heat, or corroded in place. When that happens and you cannot find your specialized wrench or do not have another car to drive to the store, these improvised methods save the day.
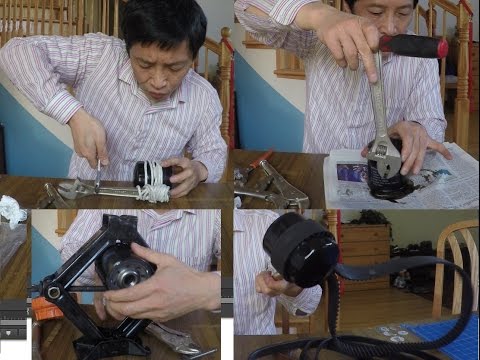
The Four Methods
Method 1: Car Jack and C-Clamp — For situations with no space restrictions, a C-clamp can grip the filter body while a jack provides the force needed to turn it. This is the brute-force approach that works on even the most stubborn filters.
Method 2: Timing Belt or Other Belts — A belt wrapped around the filter provides grip. Loop it around the filter, attach the ends to a wrench or bar, and pull. The belt conforms to the filter’s curved surface and provides excellent non-slip contact.
Method 3: Rope Plus Wrench — This was voted the best method by viewers. Wrap a length of rope around the filter, thread it through a wrench, and pull. The rope provides grip while the wrench provides leverage. Simple, effective, and uses materials everyone has.
Method 4: Wire — For tight spaces where belts and rope cannot reach, wire can be formed to grip the filter and attached to a leverage tool.
The Underlying Principle
All filter removal comes down to two elements: creating a non-slip interface between your tool and the filter, and applying enough leveraged force through a long arm to overcome the resistance. This is the same principle as opening a stuck jar — you need grip and you need leverage.