Repair LCD Monitor In 5 Minutes, Works Most of The Time
Repair an LCD Monitor in 5 Minutes: The Fix That Works 90% of the Time
Key Takeaways
- A blank LCD monitor screen is most commonly caused by failed capacitors on the power supply board — not a dead panel
- The symptom pattern is distinctive: the monitor takes longer and longer to turn on (1 minute, then 5 minutes, then it stays blank permanently)
- Opening the monitor and replacing the swollen or leaking capacitors is a straightforward fix that costs a few dollars in parts
- The back cover typically snaps off with force — there are usually no screws on the outside
- If you were going to throw the monitor away anyway, you have nothing to lose by trying this repair
The Most Common LCD Monitor Failure
I threw away five monitors last year with the same problem: a blank screen. The monitor appeared dead — no image, no backlight, nothing. This year, I decided to try fixing one instead of throwing it away. What I discovered is that the most common cause of LCD monitor failure is incredibly simple to repair.
The problem is almost always failed electrolytic capacitors on the power supply board. These capacitors degrade over time due to heat, and when they fail, they can no longer provide stable power to the monitor’s backlight and display circuitry.
The Telltale Symptom
The failure is progressive and follows a distinctive pattern:
- At first: The monitor takes about one minute to display an image after power-on
- Later: The warm-up time increases to five minutes or more
- Eventually: The screen stays blank permanently
If this matches your monitor’s behavior, there is an excellent chance that replacing a few capacitors will bring it back to life.
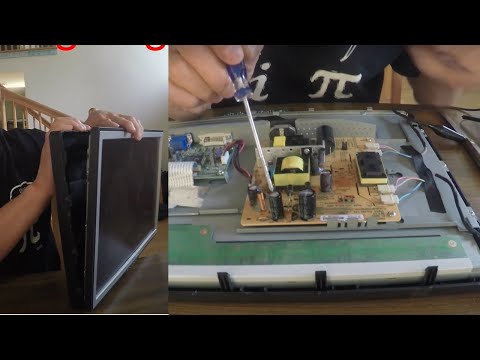
How to Open the Monitor
The first challenge is getting into the monitor. Most LCD monitors have a snap-together back cover with no visible screws. To open it:
- Look for any hidden screws under stickers, rubber feet, or the stand mounting area
- Insert a thin tool (plastic spudger, old credit card, or thin flathead screwdriver) into the seam between the front bezel and back cover
- Pry gently and work your way around the perimeter — the clips will pop free one by one
- Use force if needed — these clips are designed to hold tight, and you may need to be more aggressive than feels comfortable
Once the back cover is off, you will see the internal circuit boards. The power supply board is usually the one connected to the AC power cord.
Identifying Bad Capacitors
Look at the electrolytic capacitors on the power supply board. These are the small cylindrical components standing upright on the board. Bad capacitors are easy to spot:
- Bulging tops: The top of the capacitor (which should be flat or have a slight indentation) is swollen and domed outward
- Leaking electrolyte: Brown or dark residue around the base or top of the capacitor
- Tilting: The capacitor is leaning to one side because the bottom seal has failed
You do not need a multimeter or any testing equipment. If the capacitors look swollen or are leaking, they need to be replaced.
Replacing the Capacitors
What You Need
- Soldering iron (a basic 25-40 watt iron is fine)
- Solder and solder wick or desoldering pump
- Replacement capacitors — match the voltage rating and capacitance (printed on the side of the old capacitor). Same or higher voltage is fine; same capacitance is required
The Process
- Unplug the monitor and let it sit for at least an hour — capacitors can hold a charge
- Note the polarity of each capacitor before removing it (the negative side is marked with a stripe)
- Desolder the old capacitors using the solder wick or pump
- Insert the new capacitors matching the correct polarity
- Solder them in place with clean, solid solder joints
- Reassemble the monitor and test
The entire repair takes about 15 to 30 minutes once you have the replacement capacitors. The capacitors themselves cost $1 to $3 total, even if you buy them individually. A pack of assorted electrolytic capacitors from an electronics supplier costs under $10 and will have you covered for multiple repairs.
Why This Works So Well
The reason this repair has such a high success rate is that electrolytic capacitor failure is by far the most common failure mode in consumer electronics power supplies. It became an especially widespread problem during the early 2000s due to a bad batch of capacitor electrolyte that affected millions of electronic devices worldwide (sometimes called the “capacitor plague”).
Even after that specific issue was addressed, electrolytic capacitors remain the weakest link in most electronics because they contain liquid electrolyte that dries out over time, especially when exposed to heat.
When This Will Not Work
This repair will not fix:
- A cracked LCD panel (visible physical damage to the screen)
- Failed LED/CCFL backlight tubes (though this is less common than capacitor failure)
- Dead main processing board (rare)
- Damaged video input connectors
But given that capacitor failure accounts for the vast majority of “dead monitor” cases, it is worth trying this fix on any blank monitor before throwing it away.
For more electronics and tech repair tips, check out our guide on rearview mirror repair for another practical fix, or explore our Carnival Breeze cruise ship review for something completely different.