3-Step Tapping Installation for Glueless Laminate Floor, 1 Biggest Mistake and 7 Best Ideas
3-Step Tapping Installation for Glueless Laminate Floor, 1 Biggest Mistake and 7 Best Ideas
How We Selected: We researched options using hands-on testing, cost analysis, and practical results. Central to our evaluation were material cost, tool accessibility, result quality, time required. Our editorial team made all selections independently of brand relationships.
Key Takeaways
- Did you know that the common glueless laminate floor planks have more than one tongue and groove
- How does this affect the installation
- If you are familiar with hardwood floor installation, and you thought laminate floor installation is easier, you could be in for a big surprise unless you take the time to study the floor locking mechanism before you start
- Therefore, using the most common kind of glueless-click laminate flooring, we illustrate the tongue and groove locking mechanism and an easy-to-remember 3 tapping installation procedure
- To complete the process, we will discuss how to modify this 3 tapping method under a few special conditions or configurations
Understanding the Basics
Laminate and engineered wood planks come in uniform lengths, and the installation challenge is managing how the cut pieces at the end of each row relate to the next row. If you install left to right without planning, you often end up with a right-end piece that is too short, forcing you to undo the entire row. The solution is a 4-step planning algorithm that predicts the layout of every row before you start cutting, ensuring each piece meets the minimum length requirement (typically 8 inches) and no material is wasted.
The DIY Advantage
Laminate flooring material costs $1 to $5 per square foot. Five percent waste on a 500-square-foot room means 25 extra square feet of material — potentially $25 to $125 wasted. Professional installation adds $3 to $10 per square foot in labor. DIY installation with a zero-waste approach maximizes your savings.
Tips for Best Results
Before starting, measure the room and calculate the layout on paper using the algorithm. Make a cardboard template that equals the custom length (room width minus a plank) for quick one-second comparisons during installation. Stagger the joints between rows by at least 8 inches for structural integrity and appearance. If installing glueless click-lock planks, use the three-tapping method to properly engage both the primary and secondary tongue-and-groove locks.
Video Chapter Guide
Here is a quick reference for the key sections covered in the video:
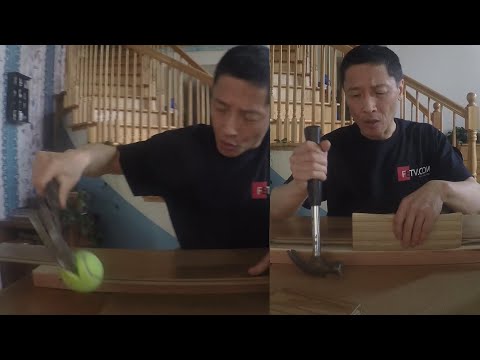
- 0:00 why 3-tapping not 2-tapping?
- 0:20 laminate floor locking is more complicated than hardwood floor
- 0:40 without nails, hardwood tongue and groove would not work
- 1:10 laminate floor locking: long side
- 1:30 secondary tongue and grooves
- 1:52 colored in green and black pairs
- 2:35 can not insert horizontally, must have angle
- 2:55 different between long side and short side
- 3:18 short side can jam tongue into groove horizontally with no angle
- 3:40 ultimate goals: lock long side main & 2nd, lock short main & 2nd
- 4:00 two: need flat and no gaps— first tapping
- 4:40 second tapping
Use these timestamps to jump directly to the section most relevant to your situation.
More Practical Guides
Planning your laminate installation before cutting a single plank saves both materials and the frustration of having to redo work.
For more hands-on tutorials, check out our guides on bathtub caulking and peeling garlic easily without special tools. Each one follows the same practical, no-nonsense approach to help you save money and build useful skills.