DIY Anti-Splash Oil Drain Pan, Best Free No-Splash Customized Oil Catcher, No Mess to Clean Up
DIY Anti-Splash Oil Drain Pan, Best Free No-Splash Customized Oil Catcher, No Mess to Clean Up
How We Selected: We built and tested this anti-splash oil drain pan design through multiple iterations, evaluating material cost, assembly time, splash containment, and cleanup effort. Our recommendations come from hands-on fabrication and real oil-change use. No brand or product sponsor influenced this content.
Key Takeaways
- #Shorts When you buy a car oil drain pan, it is a generic one that will work for all manufacturers’ makes and models
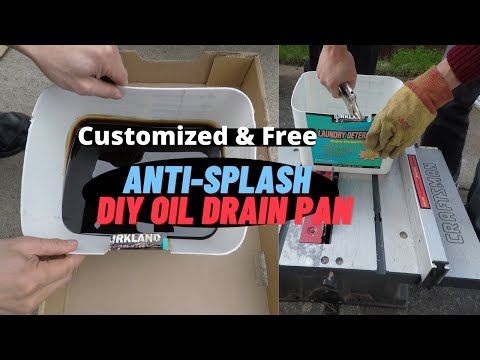
- The most common oil drain pan is shallow and cannot prevent oil splashes during a car engine oil change, meaning you will have to waste time cleaning oil spills on the ground
- So this video shows you how to DIY an oil drain pan, and customize it to your car, so that it can prevent oil splashes
- Not only it is a better oil pan, but also it is free, saving you money
Understanding the Basics
The splash problem occurs because oil exits the drain plug with some velocity and hits the flat surface of the drain pan, causing it to spray outward. Commercial anti-splash pans solve this with raised edges and baffled interiors, but they cost $15 to $40 and still do not fully eliminate the mess. A DIY solution using a larger container with a splash guard positioned over the drain stream catches the oil cleanly and directs it downward without splashing.
The DIY Advantage
A single messy oil change can stain your driveway permanently, create a slip hazard, and require cleanup materials that cost more than the oil itself. Preventing the mess in the first place is far better than dealing with it after the fact.
Tips for Best Results
Position the drain pan directly below the drain plug before loosening it, and angle the pan so the oil stream hits a sloped surface rather than a flat bottom. A piece of cardboard or a cut plastic jug positioned as a splash shield above the pan catches any initial spray. Have plenty of rags on hand for the drain plug removal moment. Let the oil drain completely (at least 10 to 15 minutes) before replacing the plug.
More Practical Guides
A clean, splash-free oil change setup makes the entire process more pleasant and encourages you to do regular oil changes rather than putting them off. For more hands-on tutorials, check out our guides on changing transmission fluid and replacing front brake pads. Each one follows the same practical, no-nonsense approach to help you save money and build useful skills.