How To replace dodge caravan front brake pad
How to Replace Dodge Caravan Front Brake Pads
Replacing the front brake pads on a Dodge Caravan is one of those maintenance jobs that sounds intimidating but is actually well within reach of any DIYer with basic tools. Dr. Zhang walks you through the entire process on a 1998 Dodge Caravan, though this procedure is similar for many other Caravan model years and comparable minivans. If your brakes are squealing or grinding, worn brake pads are almost certainly the cause, and this guide will show you how to fix it yourself and save a significant shop bill.
Key Takeaways
- Squealing brakes are caused by a small metal wear indicator on the brake pad contacting the rotor — this is your signal to replace the pads
- You need new brake pads (sold in pairs, one set per side), a C-clamp (4-inch opening), a socket wrench set, and basic wheel removal tools
- Watch out for decorative wheel caps with fake lug nuts — remove the cap first to access the real lug nuts underneath
- The two brake pad sizes are different: the longer pad with the metal spring clip goes on the outside, and the shorter pad goes on the inside
- Pay attention to pad orientation — the small notch faces forward
- After installing new pads on both sides, pump the brake pedal several times before driving to build up normal pressure
Tools and Materials
Before you start, gather everything you need so you are not hunting for tools mid-job:
- New front brake pads: These come as a set of four pads (two per wheel). Make sure you get the correct pads for your Caravan’s year and model.
- C-clamp: A 4-inch opening C-clamp is the right size for this job. You will use it to compress the brake caliper piston.
- Socket wrench set: You need a 10mm socket for the caliper bolts.
- Lug wrench: For removing and tightening the wheel lug nuts.
- Jack and jack stands: To lift and safely support the vehicle. Never work under a car supported only by a jack.
- Screwdriver: A flat-head screwdriver helps with prying the caliper if needed.
Step 1: Remove the Wheel
This sounds straightforward, but there is a catch that trips up a surprising number of people, including Dr. Zhang’s own son.
The Fake Nut Problem
Many Dodge Caravans have decorative wheel covers (hub caps) with fake lug nut details molded into them. These look like real lug nuts, but your wrench will not fit them because they are purely cosmetic. Dr. Zhang tells the story of his son calling from the side of the road, unable to remove a wheel because he was trying to turn the fake nuts on the hub cap. The solution is simple: pry off the decorative cap first to reveal the real lug nuts underneath. For more on this common mistake, see our dedicated article on working on the real nuts, not the fake ones.
Proper Wheel Removal Sequence
- With the vehicle still on the ground, use the lug wrench to loosen (but not fully remove) all the lug nuts. Loosening them while the wheel is on the ground prevents the wheel from spinning.
- Position the jack under the frame and raise the vehicle until the wheel is off the ground.
- Finish removing the lug nuts.
- Pull the wheel off and set it aside.
Step 2: Inspect the Old Brake Pads
With the wheel off, you can see the brake assembly clearly. Look at the brake pads — they are the flat friction material clamped around the shiny metal disc (the rotor). On worn pads, you will notice a small metal tab that has been making contact with the rotor. This is the wear indicator, and it is designed to create that squealing sound as a warning. When the friction material wears down far enough, this metal tab touches the rotor and makes noise on purpose so you know it is time for new pads.
Step 3: Remove the Caliper
The brake caliper is the housing that holds the pads against the rotor. It is secured by two bolts on the back side.
- Locate the two 10mm bolts on the back of the caliper.
- Remove both bolts with your socket wrench.
- Carefully slide the caliper off the rotor. It will still be connected by the brake line, so do not let it hang by the line. Rest it on the suspension or use a wire to support it.
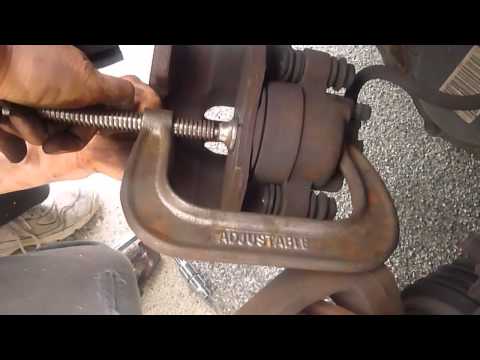
Step 4: Compress the Caliper Piston
This is where the C-clamp comes in. The caliper piston pushes the brake pad against the rotor when you press the brake pedal. Your new pads are thicker than the worn ones, so the piston needs to be pushed back into the caliper housing to make room.
- Place the C-clamp over the caliper with the screw end against the piston and the frame end on the back of the caliper.
- Slowly tighten the C-clamp to push the piston back into its bore.
- The piston will resist at first but will gradually retract. Keep going until it is fully recessed.
Note: compressing the piston pushes brake fluid back into the master cylinder reservoir. If you have recently added brake fluid, check that the reservoir does not overflow. If you are interested in brake fluid work, our guide on bleeding brake fluid on a Honda Accord covers the fundamentals that apply to most vehicles.
Step 5: Remove the Old Pads and Install New Ones
With the piston compressed, pull the old brake pads out of the caliper bracket. They are held in place by spring clips, so a bit of prying with a screwdriver may be needed.
Getting the Orientation Right
This is the step where attention to detail matters most. The new brake pads are not identical — there are two different sizes:
- The longer pad has a metal spring clip attached. This pad goes on the outside (the side facing away from the engine).
- The shorter pad has no clip. This pad goes on the inside (the side facing the engine).
Additionally, each pad has a small notch on one edge. The notch must face forward (toward the front of the vehicle). If you install a pad backwards or swap the inner and outer pads, the brakes will not function correctly and could be dangerous.
Take a moment to compare the old pads to the new ones. Note which side each old pad came from and match the new ones accordingly. Left and right orientations also matter, so do not mix up the two sides.
Step 6: Reassemble
- Slide the new pads into the caliper bracket, making sure the outside pad (longer, with clip) faces outward and the notch faces forward.
- Slide the caliper back over the rotor and the new pads. It should fit smoothly now that the piston is compressed and the new pads are in place.
- Thread the two 10mm bolts back in and tighten them securely. These bolts keep the caliper from moving, so make sure they are snug.
- Put the wheel back on, hand-tighten the lug nuts, lower the jack, and torque the lug nuts fully with the vehicle on the ground.
Step 7: Repeat on the Other Side
Front brakes are always replaced in pairs. Repeat the entire process on the other front wheel. The procedure is identical — just mirrored.
Step 8: Test Before Driving
This step is critical and easy to forget in the excitement of finishing the job. Before you move the vehicle, sit in the driver’s seat and pump the brake pedal several times. The first few presses will feel soft or go to the floor — this is normal. You are pushing the caliper pistons back out against the new pads and building up hydraulic pressure. Keep pumping until the pedal feels firm and has normal resistance.
Once the pedal is firm, start the engine and test the brakes at low speed in your driveway before heading out on the road. Listen for any unusual sounds and make sure the vehicle stops smoothly and straight.
When to Replace vs. When to Go to a Shop
Brake pad replacement is a straightforward DIY job when the rotors are in good condition. However, if you notice deep grooves scored into the rotor surface, a pulsating pedal when braking, or significant uneven wear on the old pads, the rotors may need to be resurfaced or replaced. That job requires more specialized equipment and may warrant a trip to a mechanic.
For other Dodge Caravan maintenance tasks, check out our guides on changing the transmission fluid and fixing a stuck ignition key.
Sources
- Original video on Genius Asian YouTube channel — full video demonstration and walkthrough.
- YouTube Help, Channel Monetization Policies — YouTube content guidelines for tutorial and how-to videos.