video

Idle Speed Fluctuates & Many Possible Causes (Diagnose & Fix)

By Genius Asian Updated

Idle Speed Fluctuates & Many Possible Causes (Diagnose & Fix)

What This Video Shows

welcome to Idle Speed Fluctuates & Many Possible Causes / Ways to Fix It. This is for Honda Accord 2003-2011. There are many reasons your Honda’s idle speed fluctuates. I had to perform many different tests. I have success and failures. But eventually I fixed the problem or problems. By watching my video, hope it can save you the time and money.

update 1: After I replaced the coolant see it run perfectly for a week until the problem came back see I then fixed the radiator cap problem, it run perfectly for another week.

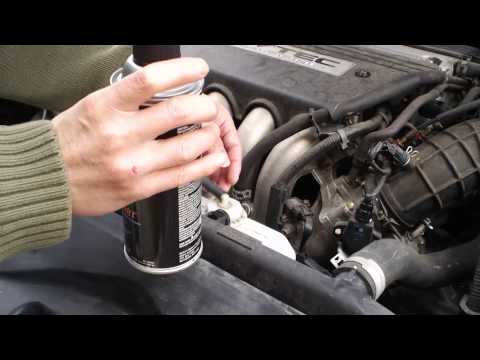
update 2: after the previous fix, a week later, the problem came back again. Then I cleaned the throttle & IAC valve, watch the car run perfectly again.

Since there are many components on either the fluid or air paths, you can watch this video and first try the easy and free ways to test to see if a particular component is causing the problem. After those free tests, you can spend some money on those components that you have to perform your regular maintenance anyway, in this way, you are not really spending money for nothing.

This way at least you eliminate a lot of possibilities so that you can focus on other hard problems. After you have done your easy testing, post your results here on the comment section, which one did you test? How was the result? Which one you could not test, we will show you some DIY tools to help diagnose other components.

Index 0:00 idles up and down 0:33 leak on intake of mixture of air or fuel 0:53 change of air & fuel mixture leads to revolution up 1:13 use your own eye sensors to see leak 1:34 hissing sound 2:08 use car’s sensor: carburetor cleaner or propane 3:39 service bulletin software upgrade 4:13 code reader 4:59 code P0507 means Idle Control System RPM High 5:31 possible cool start due to weak battery? 5:52 possible timing and fuel pressure? 6:16 check other simple things first scheduled maintenance 6:36 coolant replacement affects sensor input 7:00 after coolant flush makes sure to bleed air out 7:20 idle control unit needs time to re-learn control of idling 7:45 flushing coolant helped , but still fluctuate a little 8:32 lucky without doing anything, must be idle control unit re-learn kicked in 8:53 cold start 1500 RPM to 800 RPM warm normal 9:39 luck did not last, idle up and down again 10:15 notice collapsed coolant hose 12:26 re-train software PCM to re-learn idle control 12:49 do PCM re-learn if replace battery, replace PCM or cleaning intake 13:23 PCM re-learn process step 1 13:43 PCM step 2 and step 3 14:06 step 4: run 3000 RPM wait radiator fans kick in

other related videos

In this video I walk you through the topic step by step so you can see exactly what is involved and learn from my firsthand experience. I believe in showing real results honestly, including the mistakes and unexpected challenges I encountered along the way, because that honest approach helps viewers far more than polished demonstrations that hide the actual difficulty of a task.

Why This Matters

The knowledge and experience shared in this video represents genuine practical value for anyone interested in this topic. Whether you are tackling a similar project yourself, researching your options before committing to a specific course of action, or simply curious about how things work in the real world, this firsthand demonstration provides insights and understanding that written instructions and secondhand accounts simply cannot match.

Real-world experience often differs significantly from what textbooks, instruction manuals, and online guides describe in their idealized step-by-step format. Tasks that seem simple on paper can present unexpected and frustrating challenges in actual practice. Conversely, projects that appear intimidating based on descriptions alone often turn out to be quite manageable once you can see someone actually doing them while explaining their thought process and decision-making along the way.

Key Points to Remember

Every project, skill, or experience covered in my videos comes with its own set of important nuances that are worth understanding before you start. I have found through years of experience that the most successful outcomes come from developing three fundamental habits.

First, thorough preparation before starting, which means watching the entire video first, gathering all needed materials and tools ahead of time, and understanding what could potentially go wrong and how to handle those situations if they arise.

Second, genuine patience during the process itself. This means not rushing through critical steps even when you feel confident, giving adhesives and chemicals and processes the full time they need to work properly, and being willing to slow down when something does not feel right.

Third, honest evaluation of your results afterward. This means candidly assessing whether your outcome meets the standard you were aiming for and being willing to redo work if the result is not satisfactory rather than settling for a subpar job.

Quick Tips

Watch the full video before attempting anything yourself. Understanding the complete process from beginning to end prevents costly mistakes, wasted materials, and unnecessary frustration.

Take careful notes on critical measurements, timing, and sequences. Pausing the video to write down important details is far better than trying to remember everything from a single viewing.

Be willing to adapt the approach to your specific situation. What works perfectly in my demonstration may need adjustment for your particular circumstances, available tools, or materials on hand.

Share your results and questions in the comments section. Your feedback helps me create better content for everyone, and your unique experience may help other viewers who encounter similar situations or challenges.

For a detailed guide on this topic, also see cartrek.com.

Watch on YouTube →