Refrigerator Thermostat Not Working: Diagnosis & Repair or Emergency Fix No More Spoiled Food
Refrigerator Thermostat Not Working: Diagnosis, Repair or Emergency Fix
When the thermostat fails, your freezer is either too cold or not cold at all. If it is always disconnected, no cooling occurs. If it is always connected, the freezer becomes dangerously cold. In this video, Dr. David Zhang shows how to diagnose a thermostat problem, attempt repair, and bypass a faulty thermostat as an emergency measure to prevent food spoilage while waiting for a replacement part.
Diagnosis
The diagnostic process starts by opening the control box and measuring the thermostat resistance with a multimeter. A working thermostat shows near-zero resistance when set to cold and infinite resistance when set to off. Abnormal readings indicate a faulty thermostat.
Attempted Repair
Dr. Zhang demonstrates disassembling the thermostat to inspect and clean internal contacts. In his case, cleaning alone did not resolve the problem, but the disassembly revealed the actual mechanism of failure, informing the decision to replace rather than continue repair attempts.
Emergency Bypass
If replacement parts are not immediately available, the thermostat can be bypassed to keep the compressor running. However, without thermostat control, you must manually monitor the temperature and unplug the refrigerator when it gets too cold to prevent freezing damage to refrigerator compartment items.
For more appliance repair guides, check out how to do bathtub caulking and rearview mirror repair.
The emergency bypass option means your food does not have to spoil while you wait for parts. This alone can save hundreds of dollars in wasted food.
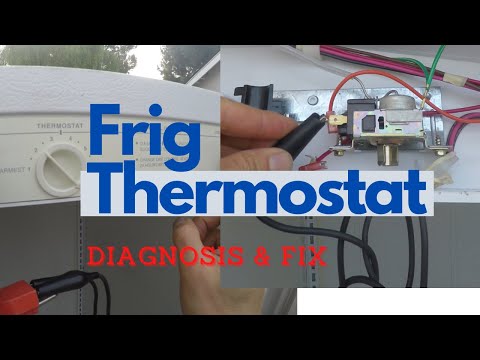
Opening the Control Box and Identifying Components
If your freezer is too cold or not cold at all, you may have a thermostat problem. If the thermostat is always disconnected, the freezer will not be cold at all. If the thermostat is always connected, the freezer will be super cold.
To access the thermostat, remove the two screws that fasten the control box to the ceiling. Remove the two control knobs, then remove the plate. Remove the two screws on the frame, then remove the screw that releases the damper control arm. Inside the control box there are two components: a control board and the thermostat. Remove two screws to get a better view of the control board. The diagram on the board shows a relay.
Measuring Thermostat Resistance
You can measure either the output of the relay or its input. The input — which is the output of the thermostat — is the easier measurement. Remove one wire from the thermostat and measure its resistance with a multimeter.
If the reading is an open circuit, something may be wrong. Turn the coldness control to both maximum and minimum. If it is still an open circuit, use a screwdriver in the slot to manually lift the contact arm. If the thermostat is still an open circuit after that, the thermostat is bad.
To verify the control board itself is not the problem, short the output of the thermostat. If the compressor starts running, the control board is confirmed working and only the thermostat is bad. A single fault is much more probable than a double fault. A replacement thermostat can be ordered from Walmart for $7.
Disassembling and Cleaning the Thermostat Contacts
Before the new part arrives, it is worth attempting a repair to save your food. Pry the frame and take out the part that holds the contacts. Inside, there is an arm. When turning to cold, the arm moves down. When turning to warm, the arm moves up.
Measure the resistance of the two contacts. If the reading shows an open circuit even when you press the two contacts together so they touch, the contacts are the problem. Wrap sandpaper around a screwdriver and clean the contacts. If that does not work, connect one multimeter probe to a razor blade and use the blade to touch the bottom contact. If the bottom contact is still conducting but the top contact reads open circuit when it touches the center platinum contact, the platinum contact has failed.
Fixing the Platinum Contact and Reassembling
Remove the top contact with pliers. Confirm that the copper strip itself is conducting everywhere — the fault is isolated to the platinum contact. Use the pliers to squeeze the platinum contact. After squeezing, the contact should open and close properly as you move it.
To reassemble the contact back into the thermostat unit, first turn the thermostat to its coldest setting so that the arm is lowered. Put the arm into the slot and move the tab into the locking space. Use a screwdriver to verify the arm can move freely.
Bypass Method and Remaining Components to Check
If you cannot fix the thermostat, you can bypass it by shorting its output so the compressor runs continuously. Because temperature control is bypassed, use a timer to cut power on a schedule, or set a phone alert to remind yourself to turn the refrigerator off before it gets too cold.
If the thermostat fixes above do not solve your problem, check components with a high probability of failure — specifically moving parts such as motors and fans. This refrigerator has six motors total, but only three run often: the condenser motor, the evaporator fan motor, and the compressor.