4 Ways to Clean Newer Model Unexposed Refrigerator Coils Without Damage
4 Ways to Clean Newer Model Unexposed Refrigerator Coils Without Damage
Key Takeaways
- Modern refrigerators have condenser coils in different locations than older models, requiring different cleaning approaches
- Dirty coils force the compressor to work harder, increasing energy consumption and shortening the refrigerator’s lifespan
- Four cleaning methods are demonstrated, each suited to different coil locations and dirt levels
- Some cleaning methods risk damaging delicate coil fins — understanding the risks prevents costly mistakes
- Regular coil cleaning every 6-12 months maintains refrigerator efficiency and longevity
Why Coil Cleaning Matters
Your refrigerator’s condenser coils release heat that is removed from inside the fridge. When these coils are covered in dust, pet hair, and debris, they cannot dissipate heat effectively. The compressor runs longer and harder to maintain the same temperature, consuming more electricity and wearing out faster.
A refrigerator with clean coils typically uses 10-25 percent less energy than one with dirty coils. Over the 10-15 year lifespan of a refrigerator, this translates to significant energy savings and potentially avoids a premature compressor failure that would require expensive repair or replacement.
Where Are the Coils on Newer Refrigerators
Older refrigerators had exposed coils on the back that were easy to see and clean. Many newer models have relocated the coils to the bottom of the unit, behind a removable kick plate, or between the back panel and the outer shell. This makes them harder to access and easier to forget about.
To find your coils, check below the front (behind a removable kick plate at floor level), behind the unit (either exposed or behind a panel), or underneath the unit (accessible from the front after removing the kick plate).
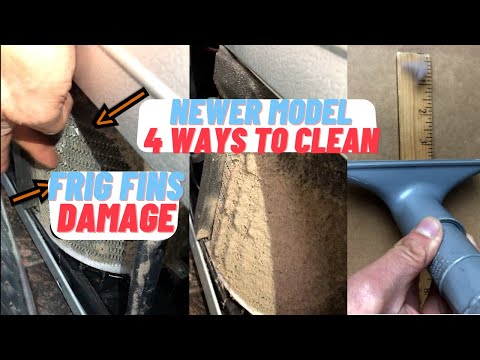
The Four Cleaning Methods
Method 1: Vacuum with Brush Attachment — The gentlest approach. Use a vacuum cleaner with a soft brush attachment to remove loose dust from the coil surface. This works well for light dust accumulation and poses minimal risk of damaging the delicate aluminum fins.
Method 2: Coil Cleaning Brush — A long, narrow brush designed specifically for refrigerator coils. These brushes reach between tightly spaced coils where a vacuum cannot access. Slide the brush in and out to dislodge trapped dust and pet hair. Follow up with a vacuum to collect the loosened debris.
Method 3: Compressed Air — Use a can of compressed air or an air compressor to blow dust off the coils. This is effective for heavy buildup but can bend the delicate fin edges if the pressure is too high or the nozzle is too close. Use short bursts at a moderate distance.
Method 4: Coil Cleaner Spray — Commercial coil cleaning spray dissolves grease and heavy buildup that mechanical methods cannot remove. Spray it on, let it foam and work for the recommended time, then rinse or wipe. This is the most thorough method but requires the most caution — ensure the spray is compatible with your coil type and follow all manufacturer directions.
Potential Damage to Avoid
The fins on condenser coils are thin aluminum sheets that bend easily. Aggressive brushing, high-pressure air, or careless contact with tools can flatten these fins, reducing airflow and heat dissipation effectiveness. If fins become bent, a fin comb (available at HVAC supply stores) can straighten them, but prevention is better than repair.
Never use a pressure washer on coils. Never poke sharp objects between coil rows. And always unplug the refrigerator before cleaning coils that require removing panels or reaching near electrical components.
How Often to Clean
The recommended cleaning frequency depends on your home environment. Households with pets (especially dogs and cats that shed heavily) should clean coils every 6 months. Homes in dusty areas or with construction nearby may need cleaning every 6-8 months. For pet-free homes in clean environments, annual cleaning is usually sufficient. Check by looking at the coils during each cleaning — if they are heavily coated, increase your cleaning frequency. If they show only a light dust layer, your current schedule is adequate. Keeping the area around the refrigerator clean (vacuuming the floor nearby regularly) also reduces the amount of debris that accumulates on the coils between cleanings, extending the intervals between deep cleaning sessions.
For more appliance maintenance, see replacing a refrigerator water filter and how to do bathtub caulking.