Hardwood Floor Part 2, how to install
Hardwood Floor Part 2: How to Install Hardwood Flooring
This is Part 2 of our hardwood floor series, where Dr. Zhang shows you the hands-on process of nailing down hardwood planks. If you followed Part 1 on preparation, your subfloor should be ready. Now it is time to actually install the hardwood. This guide covers subfloor preparation, proper nailing technique, interleaving patterns, and some clever tricks for handling tricky joints.
Key Takeaways
- Your subfloor must be solid plywood (minimum 5/8-inch thick, preferably 3/4-inch) and completely flat before installation begins
- Remove any particle board layers — they are not stable enough for hardwood flooring
- Start with a finish nailer for the first rows near the wall, then switch to a floor nailer once you have clearance
- Each board needs at least two fasteners, spaced 8-10 inches apart and 1 to 1.5 inches from the ends to avoid splitting
- Plan your interleave pattern before nailing so that end joints are staggered and never line up across adjacent rows
- Apply glue in high-traffic areas to prevent squeaky boards down the road
Preparing the Subfloor
Before a single hardwood plank goes down, the subfloor needs to be in solid condition. This step makes or breaks your entire flooring project.
Assess What Is Underneath
Pull back any existing flooring and inspect what is beneath it. If you find plywood in good condition, you can leave it in place. However, if there is particle board anywhere in the stack, it must come out. Particle board absorbs moisture, swells, and crumbles over time. It does not provide a stable foundation for nailed hardwood. Remove layers until you reach the structural subfloor.
Install or Verify Plywood
The plywood subfloor should be at least 5/8-inch thick, though 3/4-inch is preferred. If the existing plywood is too thin or damaged, install a new layer. Make sure the plywood is screwed down securely to the floor joists to eliminate any bounce or flex.
Make It Flat
Walk the entire floor and check for high spots and low spots. A floor nailer drives fasteners at a precise angle, and any unevenness in the subfloor will telegraph through to the finished hardwood surface. Sand down high spots and use floor-leveling compound to fill low areas. The flatter your subfloor, the tighter your hardwood joints will be.
Nailing the Hardwood: Tools and Technique
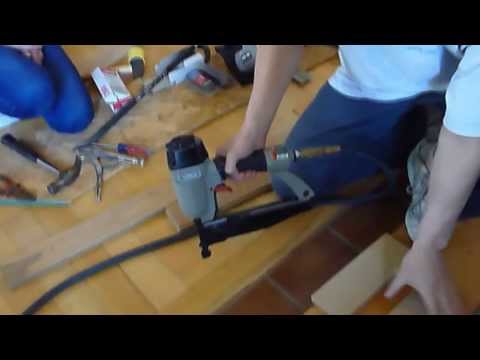
Dr. Zhang uses two types of nail guns for this job, and understanding when to use each one is essential.
Starting with the Finish Nailer
For the first two or three rows near the wall, you will not have enough clearance to use a floor nailer. Instead, use a finish nail gun to face-nail the planks. Here is the process:
- Load the finish nails into the gun (they are thinner than floor nailer staples).
- Connect the compressed air hose, making sure the gun is pointed away from anyone.
- Position the plank and nail it down, placing fasteners at least 1 inch from the end of the board to prevent splitting.
- Each board gets a minimum of two nails.
Face nailing leaves small holes visible on the surface, but these first rows will be covered by baseboard trim, so it does not matter.
Switching to the Floor Nailer
Once you have two or more rows installed and there is clearance from the wall, switch to the floor nailer. This specialized tool drives fasteners at a 45-degree angle through the tongue of each plank, creating a hidden or “blind” nail. The process works like this:
- Load the floor nailer staples — they are a different type than finish nails.
- Connect the air hose (always load nails first before connecting air to prevent misfires).
- Position the nailer against the tongue of the plank.
- Engage the trigger, then strike the plunger with a mallet.
- The staple drives through the tongue at an angle, pulling the plank tight against the previous row.
Check after each fastener that there are no gaps between boards. If you see a gap, use a tapping block and mallet to snug the plank before driving the next fastener.
The Last Rows
Just like the first rows, the last one or two rows near the opposite wall will not have clearance for the floor nailer. Switch back to the finish nailer and face-nail these final planks. Pre-drill the nail holes to avoid splitting, especially on the tongue side.
Planning the Interleave Pattern
This is one of the most important visual and structural aspects of hardwood flooring. If the end joints of adjacent rows line up, you get a visible ladder pattern that looks amateurish and creates a structural weak line.
Stagger the Joints
Before nailing a row, lay out the planks dry and make sure the end joints are offset from the row above by at least 8 to 10 inches. Hardwood planks come in varying lengths, so use that variation to your advantage. Plan ahead for each row before committing with nails, because pulling out a floor nailer staple is not easy.
Inspect Plank Widths
Not all planks are exactly the same width. Slight variations are normal, but if you get a plank that is noticeably narrower or wider, set it aside for use in a closet or less visible area. Consistency in width keeps your rows running straight and parallel.
Handling Tricky Joints
Real-world installations always throw a few curveballs. Here are Dr. Zhang’s solutions for the two most common joint challenges.
Groove-to-Groove Joints
Sometimes your layout requires joining two planks where both edges have grooves (no tongue). Dr. Zhang’s clever solution: take a paint stir stick from Home Depot. The thickness of a standard paint stick is almost exactly right to fit inside a hardwood plank groove. Use a table saw to rip the stick into a narrow strip, then glue it into one groove as a makeshift spline. Apply wood glue to both grooves and press the planks together. The paint stick bridges the gap and holds the joint tight.
Tongue-to-Tongue Joints
This scenario is less common but trickier. If two tongues face each other, you need to remove the tongue from one plank and cut a groove in its place using a table saw. Once you have converted one tongue to a groove, the joint becomes a standard tongue-and-groove connection.
Reducing Squeaky Floors
Nothing ruins a beautiful hardwood floor like squeaking every time someone walks across it. Squeaks develop when boards shift slightly under foot traffic, rubbing against each other or against fasteners.
Dr. Zhang’s preventative measure is simple: in high-traffic areas like hallways, doorways, and the paths between rooms, apply a bead of wood glue to the tongue before sliding the next plank into place. The glue bonds the planks together and eliminates the micro-movements that cause squeaking. You do not need to glue every single joint — just the ones in areas that will see the most foot traffic.
Fixing Mistakes
If you drive a staple in the wrong place or a plank goes in crooked, removal is possible but takes effort. Use a combination of pliers and a pry bar to work the staple out. The 45-degree angle of the staple makes it stubborn, so work carefully to avoid damaging the tongue of the plank. A small flat-head screwdriver can help get under the staple head. Take your time — forcing it will split the wood.
What Comes Next
With your hardwood planks installed, the floor is starting to look great, but it is not finished yet. The edges where the floor meets the walls need trim to cover the expansion gap and the face-nailed first and last rows. In Part 3: How to Trim, Dr. Zhang shows you how to make custom trim pieces from the same hardwood for a perfect color match, and how to install them using a stud finder and finish nailer.
Once the floor and trim are done, you may want to tackle the stairs. Our Part 4: Stair and Handrail guide covers how to replace carpet-covered stairs and even spiral handrails with matching hardwood.