How To Paint Without A Brush, No Need To Clean Up, DIY: The Instant Clean Up After A Small Paint Job
How To Paint Without A Brush, No Need To Clean Up, DIY: The Instant Clean Up After A Small Paint Job
Key Takeaways
- You can paint walls and surfaces without a traditional brush or roller using a DIY instant-cleanup method
- The technique eliminates the most tedious part of painting: washing brushes, rollers, and trays after the job
- A plastic bag wrapped around a suitable applicator creates a disposable painting tool that is simply thrown away after use
- This method is ideal for small touch-up jobs, tight spaces, and situations where buying painting supplies is impractical
- The finish quality is surprisingly good for the simplicity of the technique
The Biggest Problem with Painting
Most people dread painting not because of the actual painting but because of the cleanup afterward. Washing brushes and rollers thoroughly takes longer than many small paint jobs themselves. Latex paint dries quickly in bristles, making cleanup time-sensitive. And if you miss a spot during cleaning, the brush or roller is ruined for next time.
This DIY method eliminates cleanup entirely by using disposable materials as the painting tool. When you finish painting, you simply throw away the applicator. No washing, no drying, no worrying about paint drying in bristles.
The Method
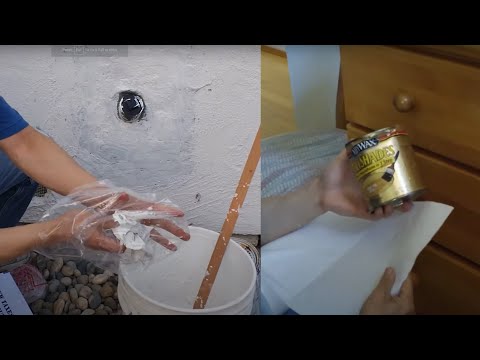
The core concept is wrapping a plastic bag or plastic wrap around a suitable applicator — a sponge, a piece of foam, or even a wadded-up cloth. The plastic exterior contacts the paint and the surface being painted, while the inner material provides structure and padding for even application.
Materials
- Plastic grocery bags, sandwich bags, or plastic wrap
- A sponge, piece of foam, or wadded cloth for padding
- Rubber bands or tape to secure the plastic
- Paint
Steps
- Wrap the padding material in a plastic bag, creating a smooth exterior surface
- Secure the plastic with a rubber band or tape so it stays in place during painting
- Dip into paint just as you would dip a brush or roller
- Apply to the surface using smooth, overlapping strokes
- When finished, remove the plastic and dispose of it. The padding underneath stays clean because it was protected by the plastic
When This Method Excels
This technique is not intended to replace professional painting equipment for large jobs. It excels in specific situations: small touch-up areas where setting up a full painting operation is overkill, tight spaces where a roller or brush cannot reach, quick single-color jobs where speed matters more than a showroom finish, situations where you do not own painting supplies and do not want to buy them for a one-time job, and outdoor painting where cleanup facilities are not readily available.
Getting a Good Finish
While this method will not produce the perfectly smooth finish of a professional roller or sprayer, the results are surprisingly good when proper technique is used. Apply paint in thin, even coats rather than thick globs. Overlap your strokes slightly to avoid gaps. Work in one direction to minimize visible stroke marks. Apply a second coat after the first dries for better coverage and a more uniform appearance.
The Broader Philosophy
This video embodies the Genius Asian channel’s approach to problem-solving: question the assumption that you need specialized tools for every task, find creative alternatives using materials already on hand, and optimize for the real-world constraints people face (limited time, limited budget, limited storage for specialized tools).
Color Matching and Touch-Ups
This disposable painting method is especially valuable for color touch-ups — those small areas where paint has chipped, been scratched, or has faded from sun exposure. For touch-ups, the imperfections of a makeshift applicator are less visible because the area being painted is small and blends with the surrounding paint. Keep a small container of each paint color used in your home, clearly labeled with the room and brand information. When a touch-up is needed, wrap a small piece of foam in plastic, dab it in the saved paint, and apply to the damaged area. The entire process takes under five minutes including cleanup (which consists of simply tossing the plastic-wrapped applicator in the trash), making it practical to address paint damage as soon as it appears rather than letting it accumulate until a major repainting project is justified.
For more creative DIY solutions, see how to do bathtub caulking and making a caulk finishing tool.