Windshield crack repair experiment 2
Windshield Crack Repair Experiment 2: Curing, Cleanup, and Final Results
Key Takeaways
- When you cannot determine if a crack is on the inside or outside, apply resin to both sides of the windshield
- For the inside surface, apply resin to the curing strip first, then stick the strip onto the glass (gravity will pull liquid resin away otherwise)
- UV-curing resin hardens in about 5 minutes in direct sunlight on the outside of the windshield
- The inside resin will NOT cure properly because windshield glass blocks ultraviolet light — wipe it off with paper towels instead
- Use a razor blade carefully to scrape off excess cured resin from the outside surface
Continuing From Part 1
In Part 1 of this experiment, I covered the initial attempt at repairing a windshield crack using a $10 repair kit. I learned several hard lessons, including that drilling a hole at the end of the crack made it longer and that identifying whether the crack is on the inside or outside layer is critical.
In this second part, I take a different approach: since I could not definitively determine which layer the crack was on, I decided to apply the repair resin to both the inside and outside of the windshield. This doubles the work, but it ensures the resin reaches the crack no matter which layer it is in.
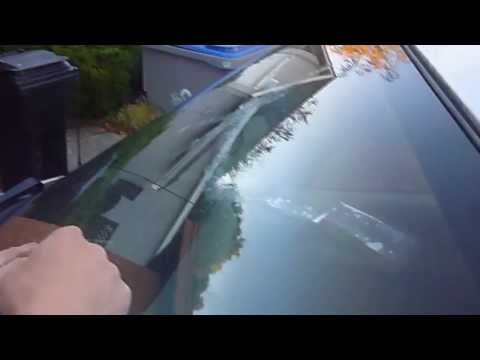
Applying Resin to the Outside
The outside application is straightforward and follows the standard process:
- Apply the resin directly along the crack — Use the applicator to lay a thin bead of resin along the entire length of the crack
- Cover with the curing strip — Place the clear curing strip over the resin. Press it down firmly to squeeze out any air bubbles and ensure the resin makes full contact with the crack
- Check for trapped air — Look closely at the strip for visible air bubbles. Small bubbles are fine as long as they are not sitting directly on the crack line. Bubbles on the crack itself will prevent the resin from filling that section
The curing strip serves two purposes: it holds the resin in place against the glass, and it creates a smooth surface that the resin will cure against, making cleanup easier.
Applying Resin to the Inside (The Gravity Problem)
Applying resin to the inside of the windshield is trickier because of gravity. The windshield is angled, and any liquid you apply to the interior surface will immediately start dripping downward. Here is how I solved this:
- Apply resin to the curing strip first — Instead of putting resin on the glass and then covering it with the strip, reverse the process. Lay the curing strip on a flat surface, apply the resin along it, and then pick up the strip and press it onto the inside of the windshield directly over the crack
- Press firmly — Hold the strip in place for several seconds so the resin makes contact with the crack
- Work in sections — For a long crack, do this in manageable sections rather than trying to cover the entire crack at once
This reverse-application technique is the key insight for interior windshield repairs. It is not in most repair kit instructions because those kits are primarily designed for exterior chip repairs.
Moving the Car Into Sunlight for UV Curing
The repair resin is UV-curing, meaning it needs ultraviolet light to harden. After applying the resin and curing strips to both sides, I moved the car from the shaded area into direct sunlight.
Outside Curing Results
The outside resin cured remarkably fast. Within about 5 minutes in direct sunlight, the resin was completely hardened. You could feel the difference immediately — what was a wet, tacky surface became hard and glass-like.
Inside Curing Results (The UV Problem)
This is where things got interesting — and not in a good way. After an hour in direct sunlight, the inside resin was still wet and white. It had not cured at all.
The reason is simple physics: windshield glass blocks ultraviolet light. This is actually by design — the UV-blocking properties of automotive glass protect you from sunburn while driving. But it also means that UV-curing resin applied to the inside surface of the windshield will never harden from sunlight alone.
Your options for curing resin on the interior side are limited:
- UV lamp — A handheld UV/blacklight lamp placed directly against the inside surface could potentially cure the resin, though I did not try this
- UV mirror — You could theoretically reflect UV light from outside onto the interior surface
- Accept the limitation — In most cases, if the crack is on the inner layer, a DIY repair kit may not be the right solution
In my case, I simply wiped the uncured interior resin off with paper towels. It came off easily since it never hardened.
Removing the Curing Strips and Cleanup
After the outside resin cured, cleanup was straightforward:
Removing the Curing Strips
The curing strips peel off easily once the resin underneath has hardened. Just find an edge and pull slowly. The strip comes away cleanly, leaving the cured resin bonded to the glass surface.
Scraping Excess Resin with a Razor
This is where you need to be careful. Use a standard razor blade held at a shallow angle to the glass:
- Hold the razor nearly flat against the windshield surface
- Scrape in one direction — push the razor along the glass to shave off the raised resin
- Use two hands for stability — one hand holds the blade, the other steadies it
- Be cautious — razor blades are extremely sharp. I managed to cut myself during this step, so consider wearing a work glove on your non-dominant hand
The cured resin scrapes off cleanly and leaves a smooth surface. You want to scrape until the repaired area is flush with the surrounding glass. Any raised resin will catch your windshield wipers and can be distracting while driving.
Cleaning the Interior
The uncured interior resin wipes off with paper towels or a damp cloth. Since it never hardened, it behaves like a slightly sticky liquid. Clean it thoroughly — you do not want resin residue on the inside of your windshield affecting visibility.
How Well Did the Repair Work?
Let me be honest about the results. The repair was partially successful:
- Sections where the resin penetrated the crack looked noticeably better. The crack line became thinner and less visible
- Sections where the resin did not penetrate looked unchanged. You could still clearly see the crack
- The drilled hole area from Part 1 was not filled at all — it remained visible as a distinct mark
Overall, the crack was reduced in visibility but not eliminated. For a $10 repair kit and about 30 minutes of total work across both sessions, it was a reasonable outcome. The crack did not spread further after the repair, which was arguably the most important goal.
Tips for Your First Attempt
My experiment was full of mistakes so yours does not have to be. Here is what I would do differently:
- Do NOT drill a stop hole — I covered this in Part 1, but it bears repeating. The drilling made my crack worse
- Determine inside vs. outside first — Spend time with the fingernail test before you start applying resin
- Move slowly when applying resin — Let capillary action do the work of pulling resin into the crack
- Have a UV lamp ready — If you suspect the crack might be on the inner layer, a UV lamp is essential since sunlight will not cure interior resin
- Work on a warm day — Resin flows better in warm temperatures, improving crack penetration
If the windshield crack eventually causes your rearview mirror to detach, that is a separate but related fix you can also handle yourself. And if you are working on other car maintenance while you are at it, check out our guide on replacing Dodge Caravan front brake pads — another straightforward DIY job.
Final Verdict
A DIY windshield crack repair kit is worth trying as a first line of defense. It will not make a crack disappear completely, but it can reduce visibility, stop the crack from spreading, and buy you time before a full windshield replacement becomes necessary. At $10 to $13, it is a low-risk investment. Just learn from my mistakes and your first attempt should produce better results than mine did.
Sources
- Original video on Genius Asian YouTube channel — full video demonstration and walkthrough.
- YouTube Help, Channel Monetization Policies — YouTube content guidelines for DIY repair tutorials.