Easiest DIY: Replacing Brake Pads for Toyota 4Runner In 5 Minutes and No Fluid Leaking
Easiest DIY: Replacing Brake Pads for Toyota 4Runner in 5 Minutes With No Fluid Leaking
Key Takeaways
- The Toyota 4Runner has a different brake caliper design than most vehicles — do NOT remove the four caliper bolts or brake fluid will start leaking
- Instead of removing bolts, pull out the two retaining pins to access the brake pads
- Use a C-clamp to compress the caliper piston before installing the thicker new pads
- The entire job takes about 15 minutes per wheel with basic hand tools
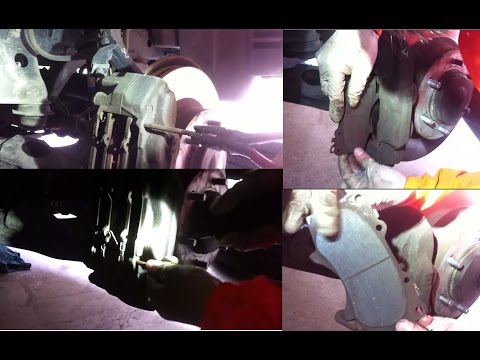
- One pad in each pair has a small metal wear indicator that creates a squealing noise when the pad is worn down — make sure to install it in the correct position (furthest from you)
Why the 4Runner Is Different
If you have ever replaced brake pads on a Honda, Dodge, or most other vehicles, you are used to removing caliper bolts, sliding the caliper off, swapping the pads, and bolting everything back on. The Toyota 4Runner uses a different design that is actually simpler — once you know the trick.
The 4Runner’s front brake caliper has four visible bolts, and your first instinct will be to start loosening them. Do not do this. Those bolts hold the caliper housing together, and removing them opens up the hydraulic system. Once the caliper is open, brake fluid will start leaking out, creating a mess and requiring you to bleed the brake system afterward.
Instead, the 4Runner uses a pin-based system. Two retaining pins hold the brake pads in place within the caliper. You simply pull the pins out, swap the pads, and push the pins back in. No bolts. No fluid. No bleeding.
I wish I had known this before I started. Watch this video before you work on your 4Runner so you do not make the same mistake many first-timers make.
Tools and Parts You Need
This is a refreshingly short list:
- New brake pads — Get the correct pads for your 4Runner’s year and trim. The parts store can look this up by your VIN
- C-clamp or brake piston tool — A basic C-clamp from the hardware store works perfectly
- Pliers or pin puller — For removing the retaining pins
- Jack and jack stands — To lift the vehicle and remove the wheel
- Lug wrench — To remove the wheel
That is it. No socket sets, no torque wrenches, no special brake tools. This is genuinely one of the simplest brake pad replacements of any vehicle.
Step-by-Step: Replacing 4Runner Brake Pads
Step 1: Lift the Vehicle and Remove the Wheel
Park on a flat, level surface. Loosen the lug nuts slightly while the wheel is still on the ground (this prevents the wheel from spinning). Then jack up the vehicle, place it securely on jack stands, and remove the wheel completely.
With the wheel off, you can see the brake caliper sitting over the brake rotor. The caliper is the large metal component that houses the brake pads.
Step 2: Identify the Pins (Not the Bolts)
Look at the caliper and identify the two retaining pins. They are typically smaller than the bolts and may have clips or retaining hardware on the ends. On most 4Runner models, the pins run horizontally through the caliper.
You will also see the four larger caliper bolts. Again — leave these alone. They are not part of the pad replacement process.
Step 3: Remove the Anti-Vibration Clip
Before pulling the pins, there is usually an anti-vibration clip or spring that sits over or between the pads. This clip keeps the pads from rattling while driving. Remove it by hand or with pliers and set it aside. You will reinstall it after the new pads are in place.
Step 4: Pull Out the Retaining Pins
Using pliers, pull the retaining pins straight out. They should slide out with moderate effort. Once both pins are removed, the brake pads are free to come out.
Step 5: Compress the Caliper Piston With a C-Clamp
Before removing the old pads, use a C-clamp to push the caliper piston back into its bore. There are two reasons for this:
- Removing the old pads — Compressing the piston creates more clearance, making it easier to slide the old pads out
- Installing new pads — New brake pads are significantly thicker than worn pads. The piston needs to be pushed all the way back to create enough room for the new pads to fit
Place the C-clamp with one end against the back of the caliper and the other end against the old brake pad (or directly against the piston face). Tighten the clamp slowly and steadily. You will see the piston move inward. Compress it on both sides — there are pistons on each side of the caliper.
Note: When you compress the piston, brake fluid gets pushed back up into the master cylinder reservoir. Before you start, check that the reservoir cap is loose (not sealed tight) to prevent pressure buildup. If the reservoir is very full, you may need to remove a small amount of fluid with a turkey baster to prevent overflow.
Step 6: Remove the Old Pads and Install New Ones
With the piston fully compressed, slide the old brake pads out. They should come out easily now.
Before installing the new pads, take a moment to inspect them. You will notice that the two pads in each pair are not identical:
- One pad has a small metal tab — This is the wear indicator. When the pad wears down to a certain thickness, this metal tab contacts the rotor and produces a high-pitched squealing sound, alerting you that it is time for new pads
- The other pad is plain — No wear indicator
The pad with the wear indicator goes on the far side (furthest from you when looking at the caliper from the wheel side). The plain pad goes on the near side. Getting this right ensures you hear the wear warning at the appropriate time.
Slide the new pads into position. They should fit snugly between the compressed pistons.
Step 7: Reinstall Pins, Clip, and Wheel
With the new pads in place:
- Slide the retaining pins back through the caliper. They should go in the same way they came out
- Reinstall the anti-vibration clip
- Put the wheel back on, hand-tighten the lug nuts, lower the vehicle off the jack stands, and then torque the lug nuts to spec (typically 83 ft-lbs for 4Runner models, but check your owner’s manual)
Step 8: Pump the Brake Pedal
This step is critical and easy to forget. Before you drive, sit in the driver’s seat and pump the brake pedal several times. The first few presses will go nearly to the floor because the piston is fully compressed and not yet contacting the new pads. After 3 to 5 pumps, the pedal should feel firm and normal.
Do not skip this step. If you drive without pumping the brakes first, you will have no braking power the first time you press the pedal. This is dangerous.
How Long Does This Take?
The video title says 5 minutes, and while an experienced person can do it that quickly, plan for about 15 minutes per wheel if this is your first time. That includes jacking up the car, removing the wheel, swapping the pads, and putting everything back together. Even at 15 minutes, it is dramatically faster than a typical brake pad replacement on other vehicles.
Cost Savings
A brake pad replacement at a shop typically costs $150 to $300 per axle (both front wheels). Buying the pads yourself costs $20 to $50 for a quality set. That is a savings of $100 to $250 for about 30 minutes of your time — one of the best return-on-investment DIY car repairs you can do.
Related Brake and Car Repair Guides
If you are interested in more brake-related DIY repairs, check out these guides:
- How to replace Dodge Caravan front brake pads — A different caliper design but the same money-saving approach
- Honda Accord brake fluid bleeding — Essential knowledge if you ever accidentally open the hydraulic system
- How to turn off the maintenance light on a Honda Accord — Another quick fix that saves a trip to the dealer
Sources
- Original video on Genius Asian YouTube channel — full video demonstration and walkthrough.
- YouTube Help, Channel Monetization Policies — YouTube content guidelines for tutorial and how-to videos.